1. Product Active / Inactive
Currently, Vendor Center supports sellers to batch Active/Inactive products through the page or file upload. Special note: If an FBJ product has inventory, the system does not allow deactivating the corresponding product.
Click here to view the operation video.
The operations are as follows:
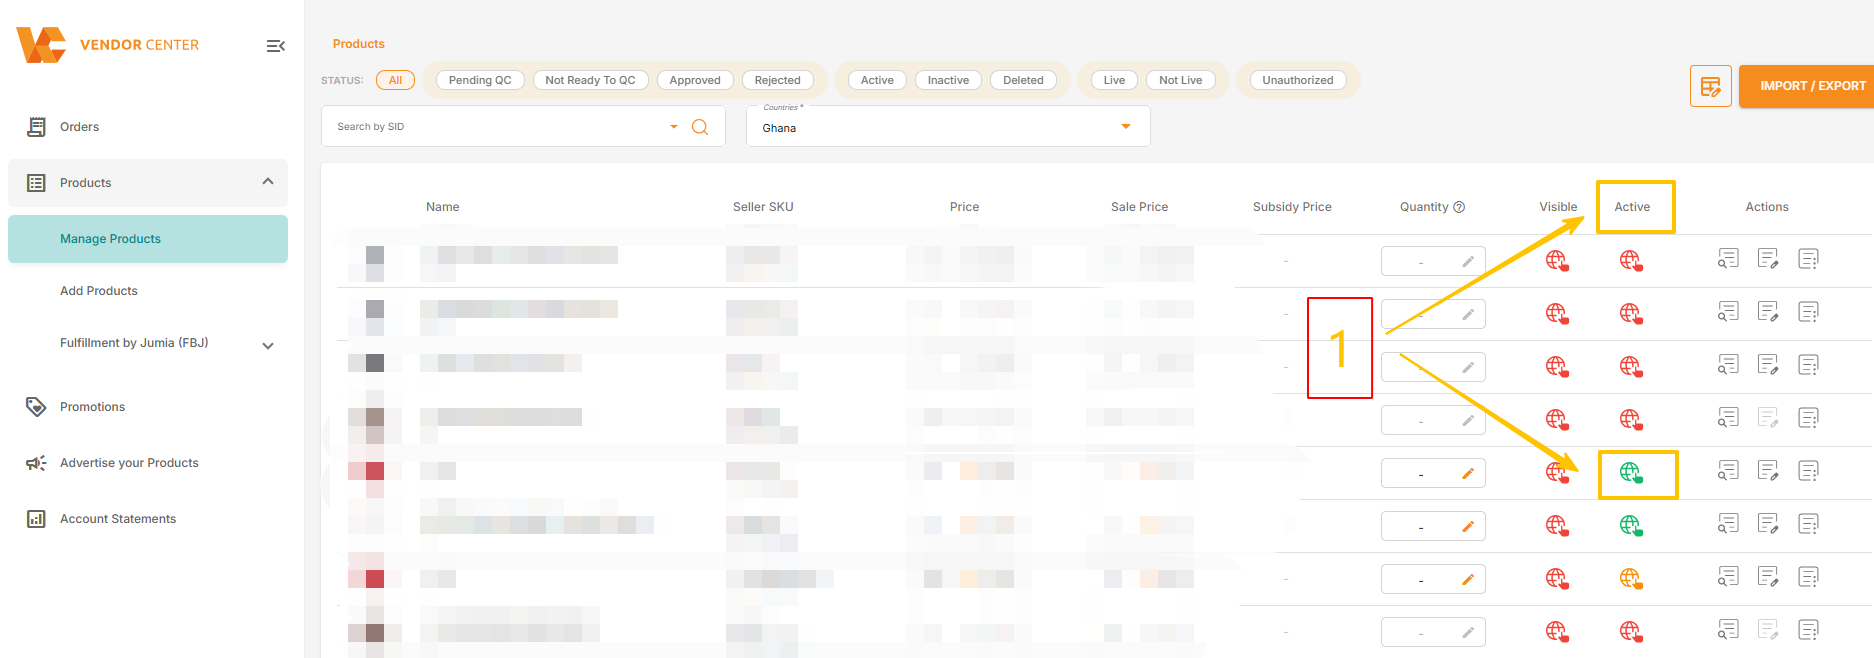
1.1 Active/Inactive a product on the backend page
- On the Manage Products page, click the icon under “Active”.
- After the page expands, you can launch (Active) or discontinue (Inactive) products by country by clicking the white circular button.

1.2 Batch Active/Inactive Products
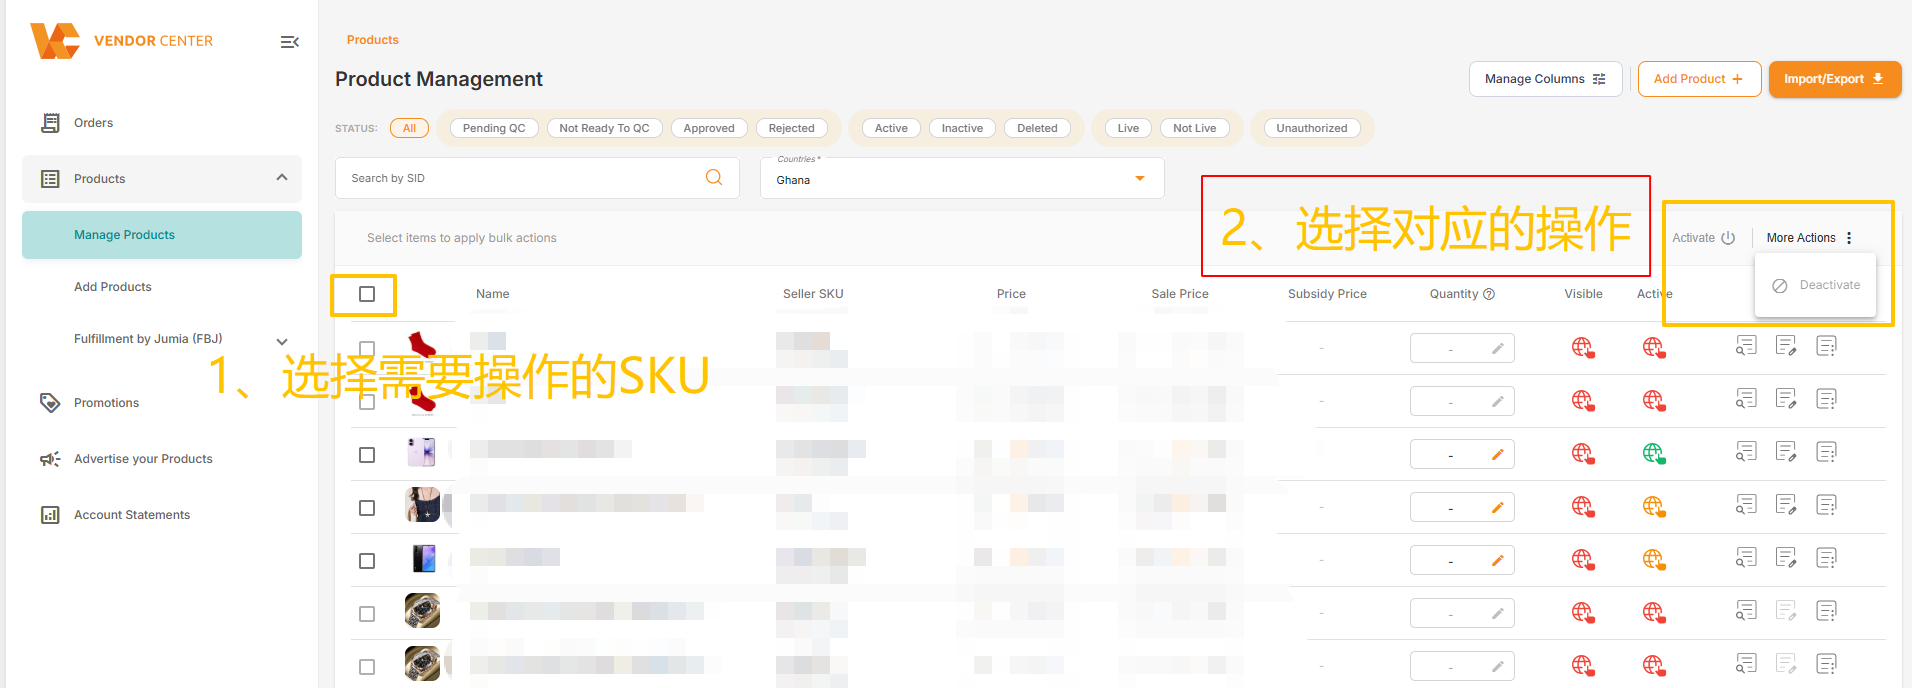
1.2.1 Batch Activation/Deactivation of Products on the Backend Page
- On the Manage Products interface, select the products to be activated/deactivated.
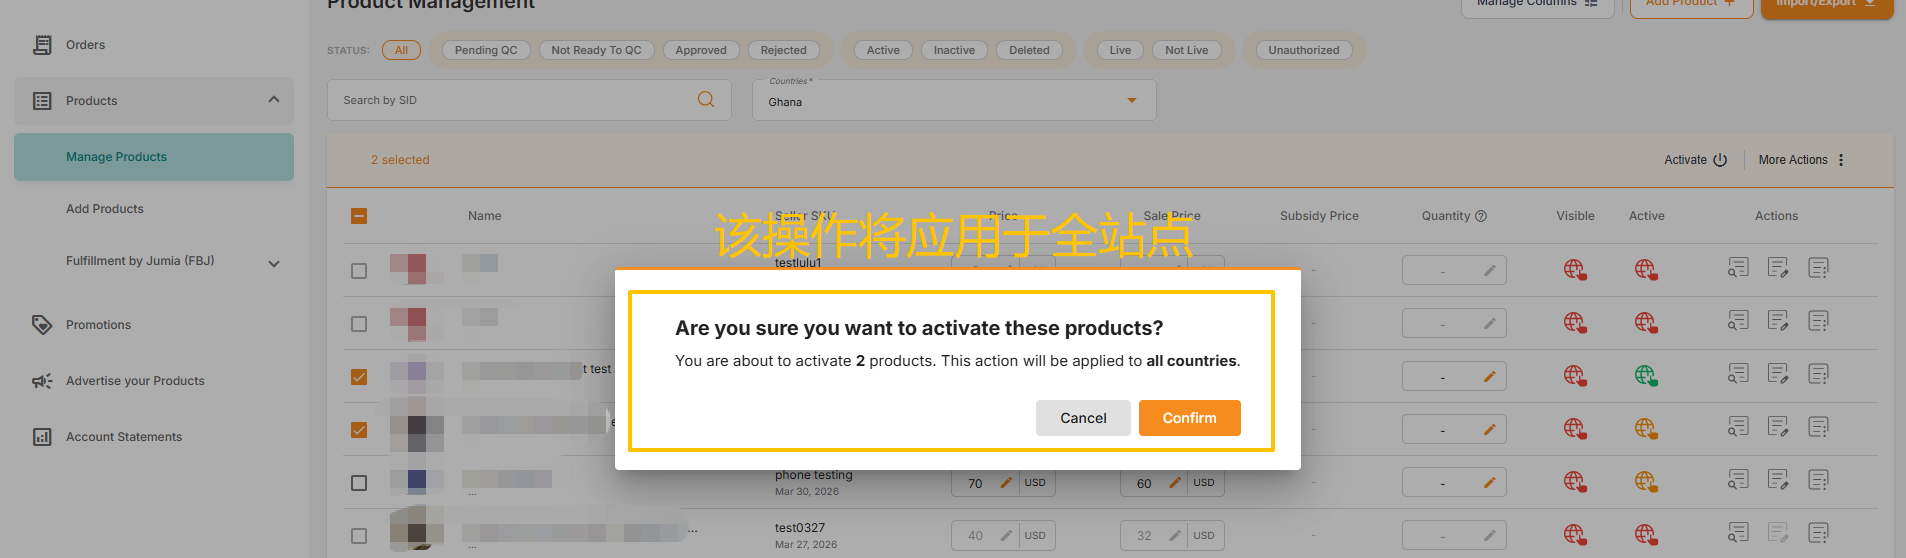
- Click “Activate” in the upper right corner for the selected SKUs; the operation will apply to all sites.
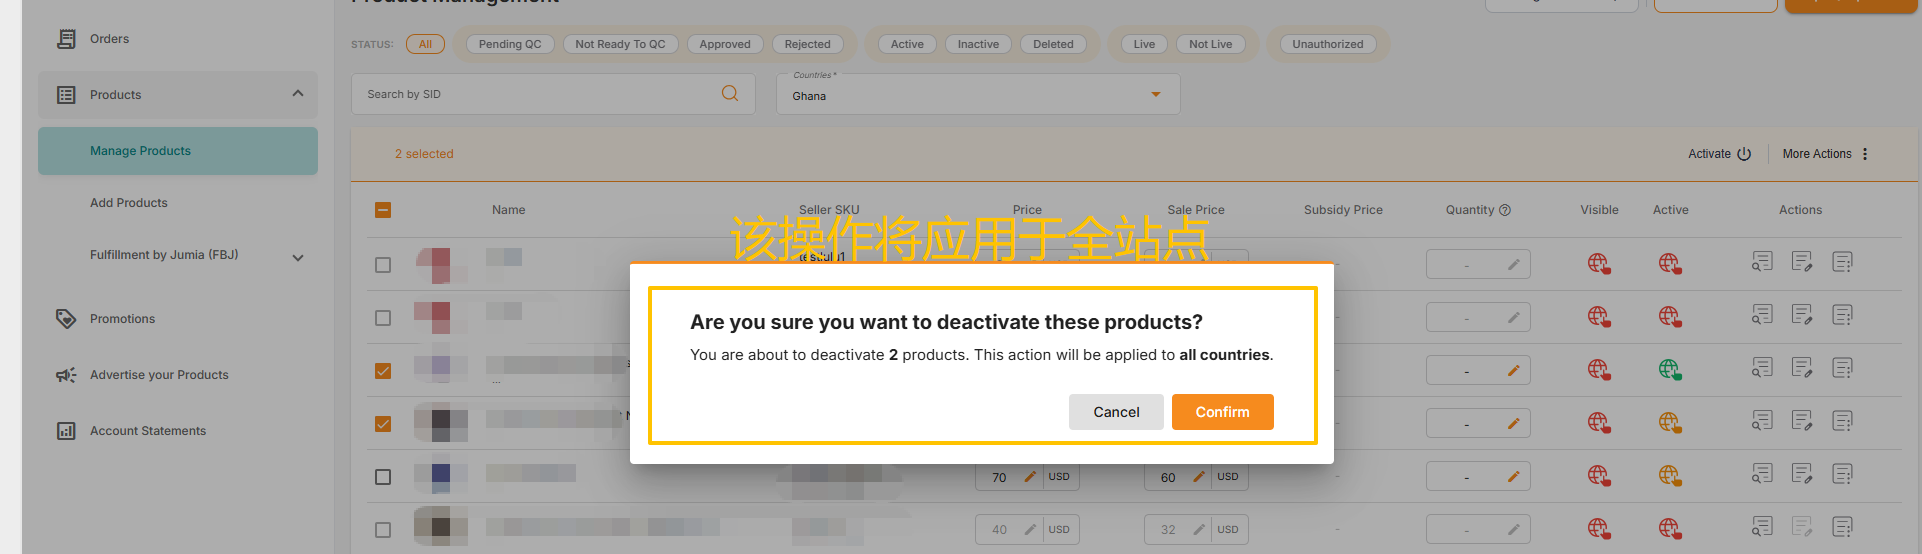
- Click “More Actions” and select “Deactivate” for the selected SKUs; the operation will apply to all sites.
1.2.2 Batch File Upload
- Click “IMPORT / EXPORT” under Manage Products.
- Select Product for Type and Export Status for Action.
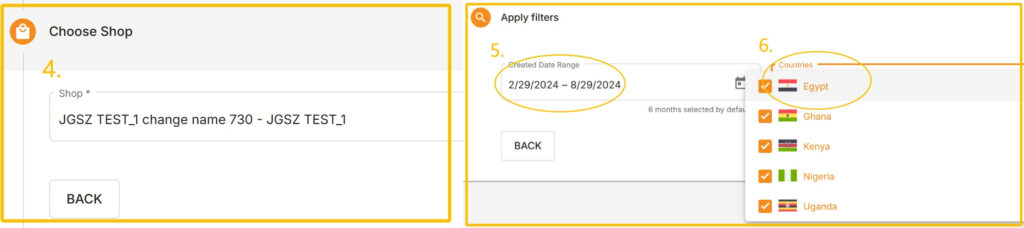
- Customize the product creation time and site, then click Export.
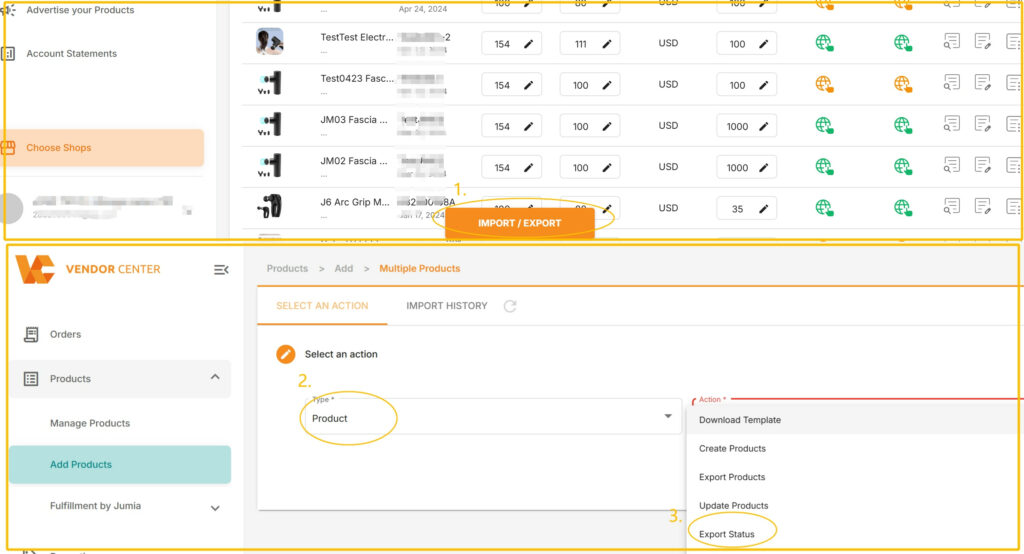
- You can see the status of each site by downloading the form.
- If you need to take the product offline: enter “INACTIVE”
- If you need to put the product online: enter “ACTIVE”
- You can enter according to actual needs in the corresponding country.
Suppose a seller needs to Inactive a certain SKU in all countries, here is an example:

- Edit the table and send it back: select “Product” for Type, select “Import Status” for Action, then drag the table to the box to upload it.

- Check the file upload results.
Click on Upload History to view the upload results, which include:
-
- Created at: Creation time.
- User: Creator.
- File: The uploaded file can be downloaded.
- Action: Operation category.
- Status: Status. Click on the status to view the completion progress percentage (%).
- Progress: “Finished” indicates completion, or download the error file.
There are 5 types of statuses:
-
- Pending: Waiting to upload.
- Completed: Completed.
- In progress: Uploading in progress.
- Failed: Upload failed. Please download the error report to check the reason.
- Failed: Partially failed. Click on the progress bar to view the success percentage.

2. Product Deletion
There are currently two ways to delete products in the VC system: 1) direct deletion; 2) batch deletion via a table.
Please note that the deleted status cannot be recovered, and the product will still appear under the “All” filter in the backend. Special note: If an FBJ product has inventory, the system does not allow deleting the corresponding product.
Click here to view the operation video.
The operations are as follows:
2.1 Direct Product Deletion
Products can be deleted directly from the product management interface. This supports deleting the SKU from all countries/regions, or deleting by a single country/region.
Note: Deletion is only allowed when there is no FBJ inventory, no pending or generating consignment requests, and no valid orders.
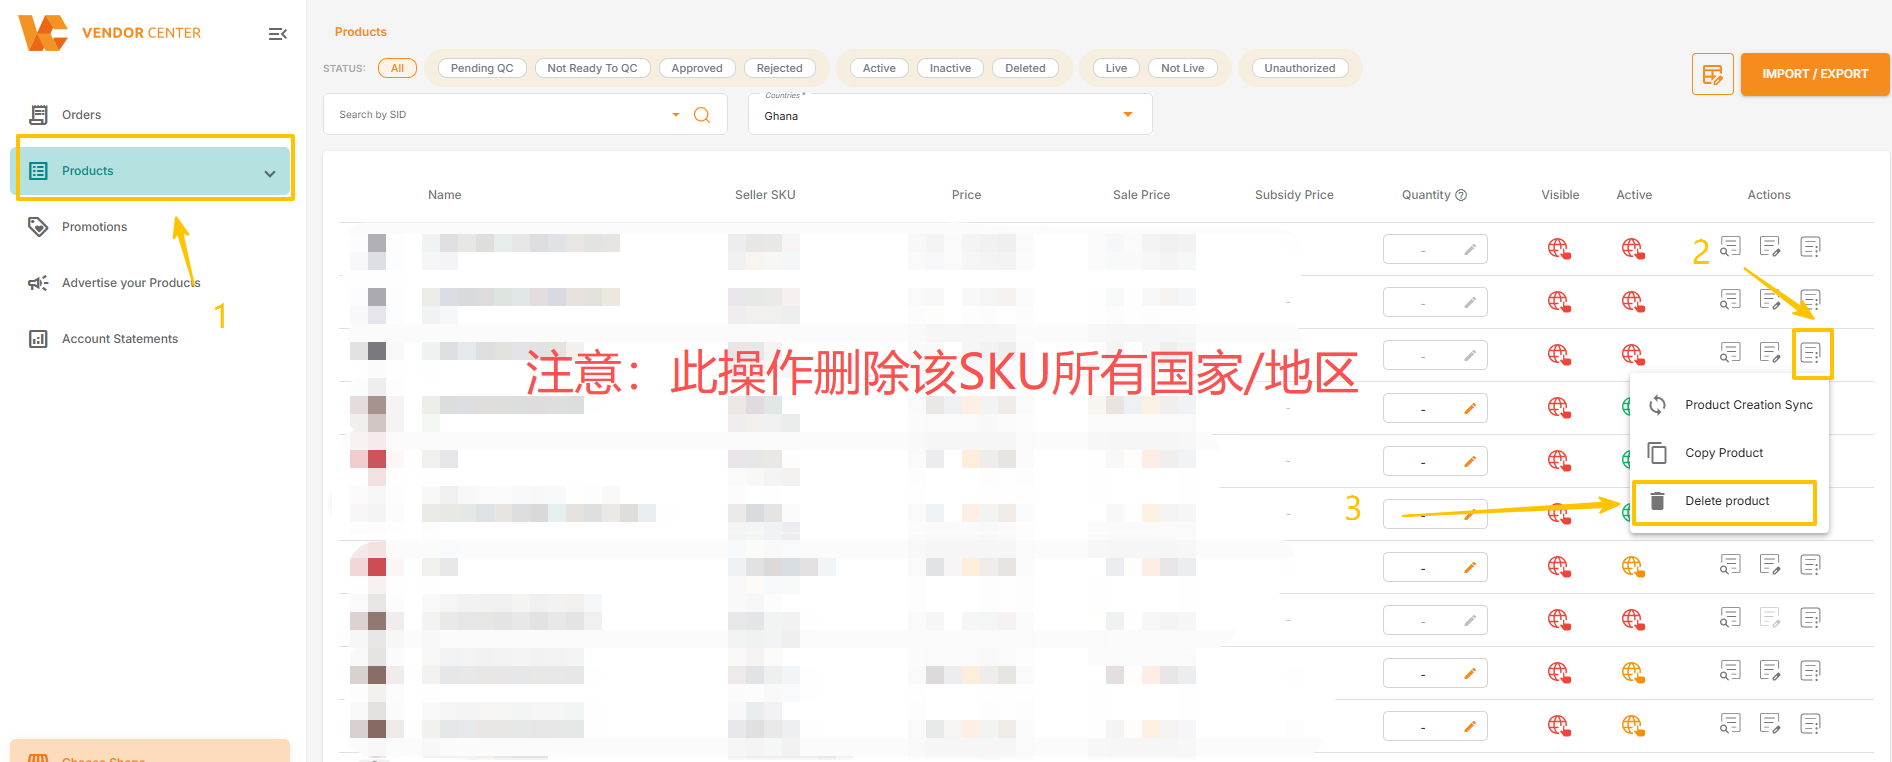
2.1.1 Deleting Product Information for a SKU from All Countries/Regions
Select the SKU to be deleted, click Operation → Delete Product, and the SKU will be removed from all countries/regions.
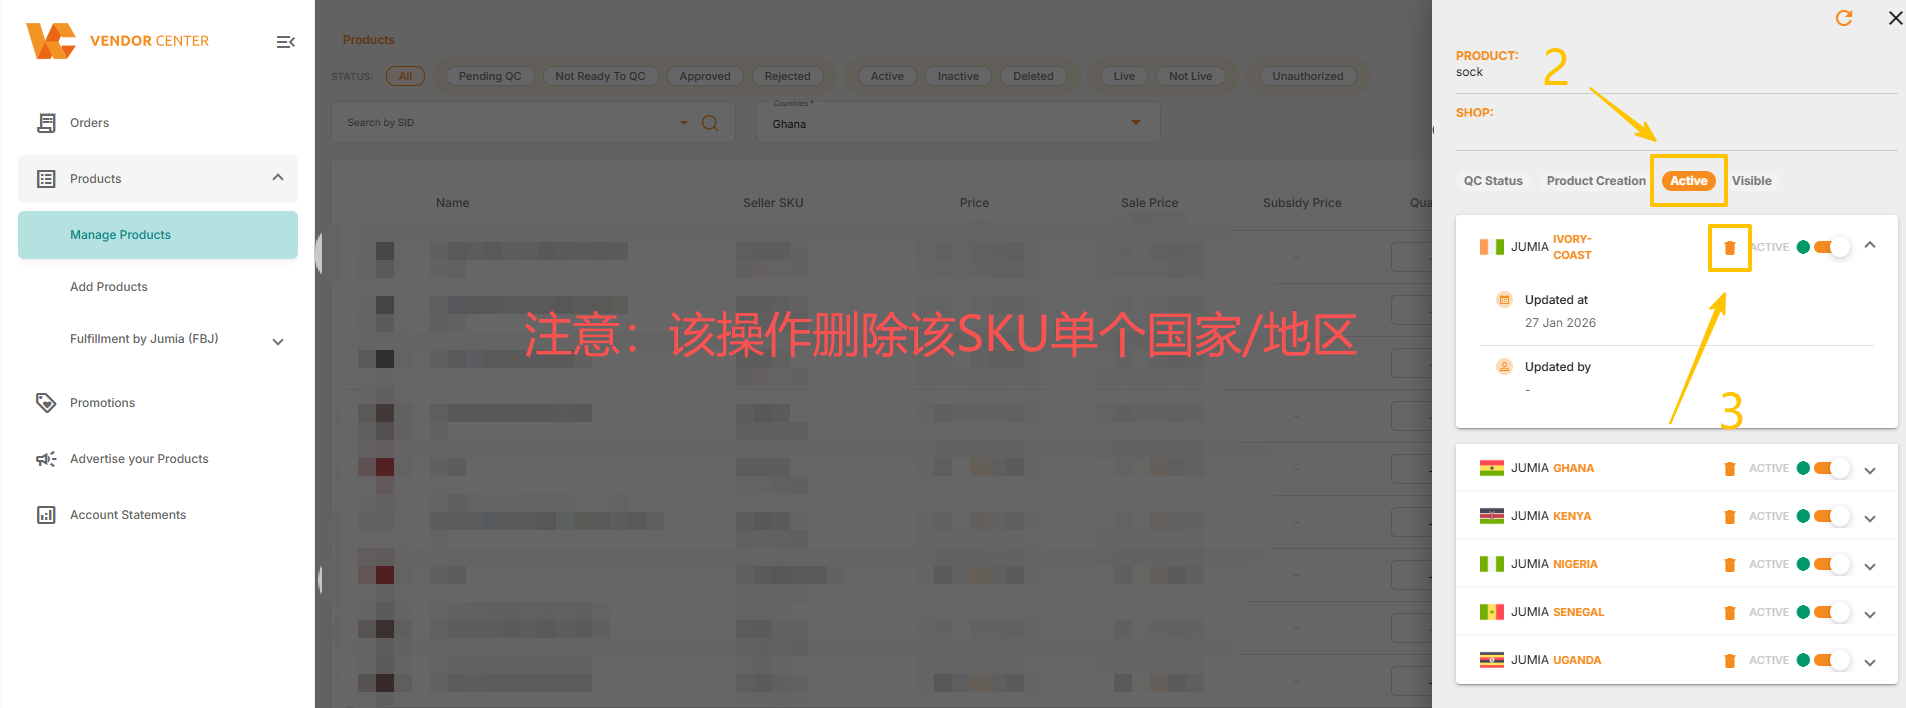
2.1.2 Deleting Product Information for a Single Country/Region for a SKU
Click the spherical icon for the corresponding SKU, click the status bar, select the target site, and click the delete icon next to the status bar to delete the product for that site.
2.2 Batch Deleting Products
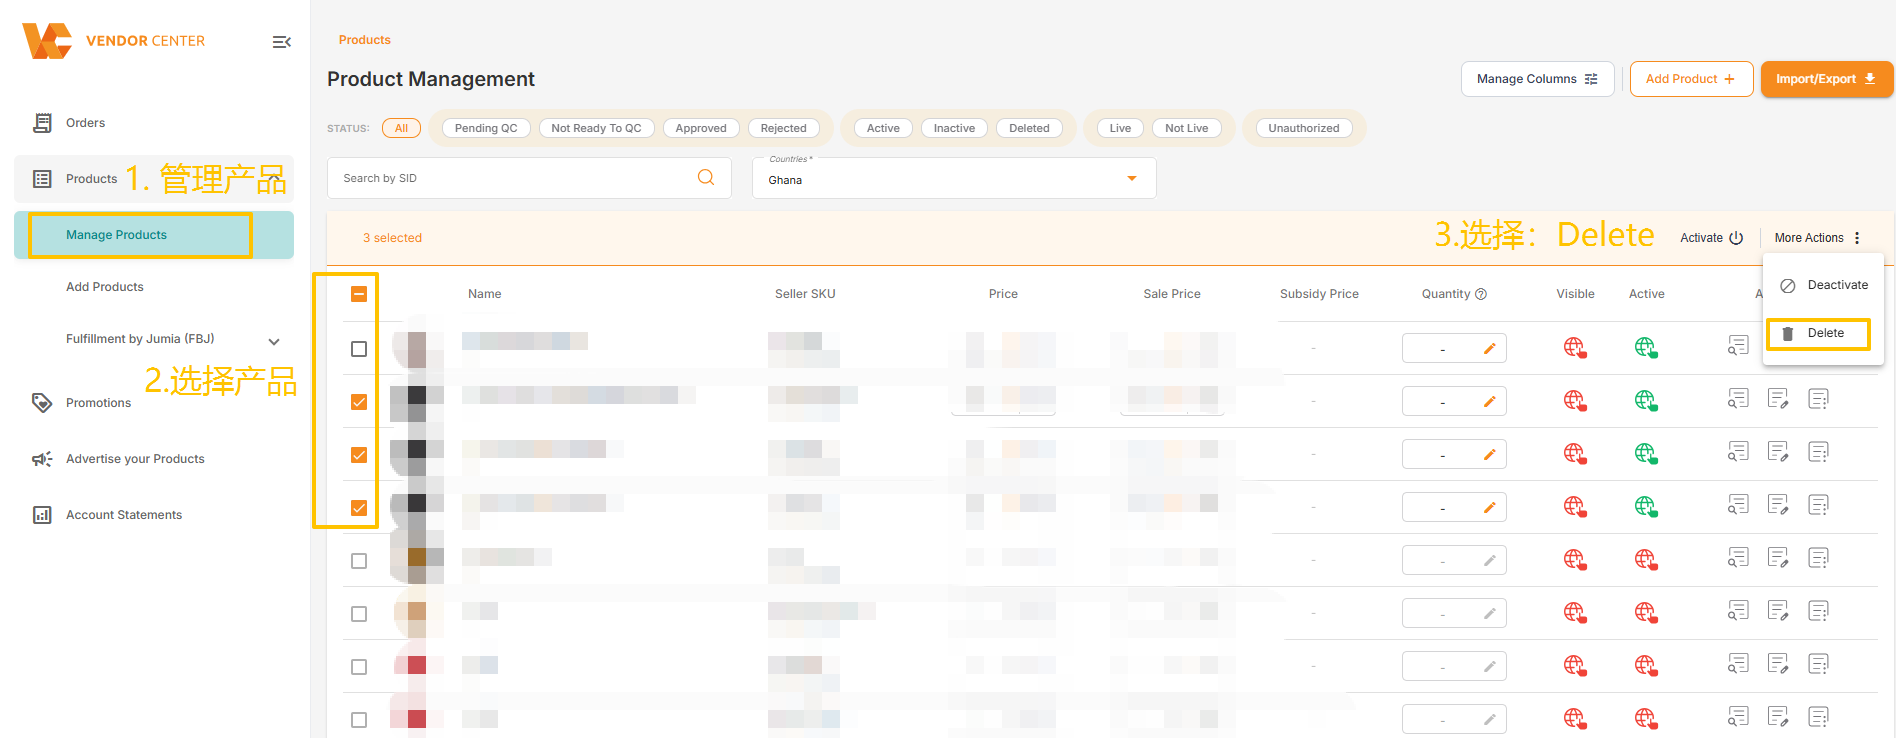
2.2.1 Batch Deleting Products via Product Management Interface
Path: Products >> Manage Products >> Select Products >> Actions >> Delete
Note: This operation can only select a maximum of 100 products at a time. Once deleted, they cannot be recovered. Additionally, please carefully check whether these products are included in any pending orders.
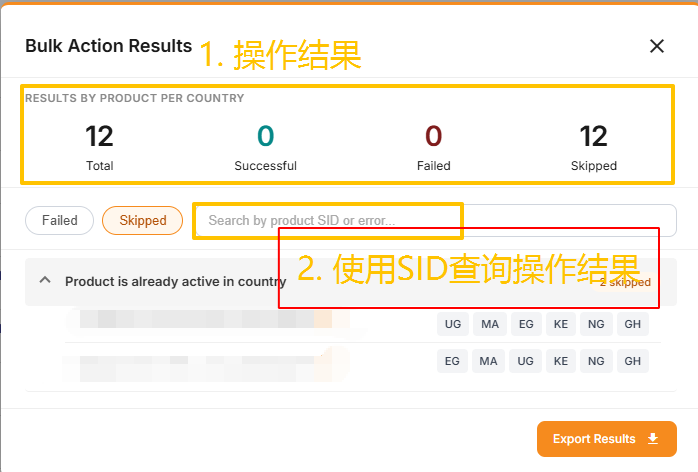
If deletion fails, the system will display a detailed explanation of the results. You can view the results by searching for the product SID on this page, or download the results report for management.
2.2.2 Batch delete products via file
- Click “IMPORT / EXPORT” under Manage Products.
- Select “Product” for Type and “Export Status” for Action.
- Customize the product creation time and site, then click Export.
- Download the form to view the status of each site.
- If you need to take the product offline: enter “DELETED “.
- You can enter it in the corresponding country according to actual needs.
Suppose a seller needs to mark a certain SKU as DELETED in all countries, here is an example:

- Edit the form and send it back: select “Product” for Type, select “Import Status” for Action, then drag the form to the box to upload it.
- Check the file upload results.
Click on Upload History to view the upload results, which include:
- Created at: Creation time.
- User: Creator.
- File: The uploaded file can be downloaded.
- Action: Operation category.
- Status: Status. Click on the status to view the completion progress percentage (%).
- Progress: “Finished” indicates completion, or download the error file.
There are 5 types of statuses:
- Pending: Waiting to upload.
- Completed: Completed.
- In progress: Uploading.
- Failed: Upload failed. Please download the error report to check the reason.
- Failed: Partially failed. Click on the progress bar to view the success percentage.
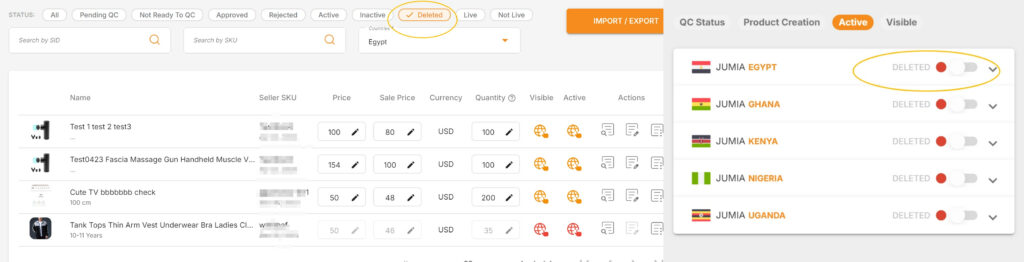
2.3 How to check if a product has been successfully deleted
Go to the product management page and click “DELETED” to display all products that have been successfully deleted (including products deleted in some countries and products deleted in all countries).
3. How to search for products?
Jumia Vendor Center (VC for short) has officially launched the Jumia SKU search function! This function aims to help sellers manage products more efficiently, quickly locate and handle tasks related to specific SKUs.
How to use the Jumia SKU search function?
- Log in to your Jumia Vendor Center account.
- Enter the “Manage Products” page. In the left navigation bar of the Jumia VC interface, find and click the “Manage Products” option.
- Select the search type. After entering the product list page, you will see a search box. By default, this search box may be set to search by other types (such as SID). Click the drop-down arrow next to the search box, then select “Search by Jumia SKU” as your search type.
- Enter the Jumia SKU and search. Enter the Jumia SKU you want to find in the search box. After entering, the system will automatically perform the search.
- View search results. The search results will only display products that exactly match the Jumia SKU you entered, making it easy for you to quickly locate specific products.
4. Product deactivation (operated by the platform)
4.1 Reasons for product deactivation and conditions for re-listing
| # | Reason for Deactivation | Conditions for application to be listed |
|
1 |
Product quality return rate(QRR>=5% and the number of returns>=5) | Once a product is deactivated from the platform, it will not be approved for relisting and will be directly returned to vendor. |
|
2 |
The product has not obtained sales permission. | Provide the specified sales license according to the reason for removal from shelves. If it is specified as a prohibited item, it cannot be put on the shelves. If there is inventory in the warehouse, it needs to be returned to the warehouse for processing. |
|
3 |
The product has not obtained a license and has been determined to be a prohibited item. | Not available for listing. If there is inventory in the warehouse, it needs to be returned to the warehouse for processing. |
|
4 |
The product was reported by the brand owner for infringing intellectual property rights. | Not available for listing. If there is inventory in the warehouse, it needs to be returned to the warehouse for processing. |
|
5 |
Product content issues such as incorrect product categories and inconsistency between images and texts | Revise the product again according to the reason for its removal from the shelves. |
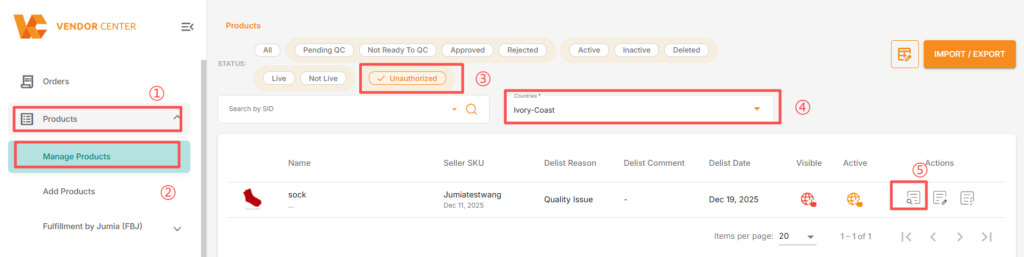
4.2 How to view deactivated products
Path 1:Vendor Center>>Products>>Manage Products>>Select Unauthorized>>Select the country,You will be able to see all the products of this country that have been removed from the shelves. >> Click on the spherical icon to view the specific reasons for the removal.
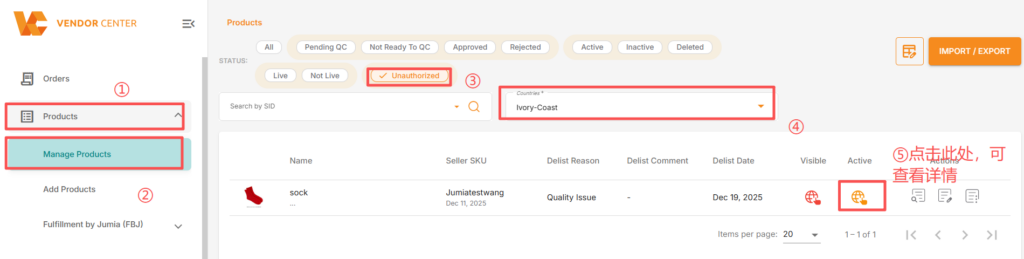

Path 2: Vendor Center >> Products >> Manage Products >> Select Unauthorized >> Select a country, and you will be able to see all the products that have been removed from the shelves in that country >> Click on product details >> Authorization >> You can see the specific reason for the removal.